Bean Casserole

Dieting is the only game where you win when you lose (Karl Lagerfeld)

This week I have chosen a simple, tasty and healthy recipe to share with you. Here it is:

Bean Casserole

Serves 4-6

Ingredients

Bean Casserole

Bean Casserole

1 x 420 gram can of mixed beans (I use mixed beans in mild chilli sauce by Sainsburys)
2 x 400 gram cans of peeled plum tomatoes
1 x 165 gram can of sweetcorn
1x 425 gram can of baked beans (you can use the value brand for this)
Approximately 220 grams of frozen mixed peppers
1 large carrot
1 large courgette
1 medium onion
1 clove of garlic
2 tsp. Cajun spice
Salt and peppers to taste
1 tbsp. olive oil

Method

  1. In a deep sided large frying pan, heat up the olive oil.
  2. Add the frozen peppers to the pan once the oil is heated.
  3. Whilst the peppers are cooking, chop the carrots, courgette and onion into small pieces and add to the pan.
  4. Crush and chop the garlic up as small as you can and add to the pan.
  5. Fry the veg for about 10 minutes.
  6. Open up all the cans.
  7. First add the can of mixed beans and stir.
  8. Then add the sweetcorn and stir.
  9. Pour the can of beans into a sieve and place under some cold water to wash away the tomato sauce. Add to the pan and stir.
  10. Finally add the two cans of plum tomatoes, break up the tomatoes with a wooden spoon and stir so all the veg are covered in the tomato sauce.
  11. If the veg are not covered, add some more water.
  12. Add the Cajun spice and some salt and pepper to taste.
  13. Leave to simmer for approximately 20 minutes or until you a happy with the consistency.
    Serve.

Suzy says:

  • Eat on its own or accompanied with rice or pasta.
  • If you like spice, add more Cajun or some hot chilli powder.
  • Try sprinkling some grated cheese on it as well. Delicious!

Bon appetit.

Hot Choc Buns

Good Friday comes this month, the old woman runs, with one or two a penny hot cross buns (Poor Robin’s Amanack (1733) )

Hot Choc Buns

Hot Choc Buns

I always like to make an effort to bake something traditional and seasonal to mark special times of year and so last Easter, I  decided to try my hand at Hot Cross Buns. Only trouble is, my husband and I both can’t stand dried fruit, so as usual I opted for chocolate instead!

My first attempt was using a gluten-free recipe, which we both loved, but didn’t keep fresh for very long.  This year, I opted instead for the ‘gluten-full’ version as I was keen to try my skills at kneading dough. We loved this too!

Hot Choc Buns

(Serves 12)

Ingredients

625 grams strong white flour
1 1/2 tsp. fast action yeast
1 tbsp. sugar
1 tbsp. honey
1 tbsp. cocoa powder
1tsp salt
50 grams of butter plus extra butter for greasing.
1 egg
275 ml milk
100 grams white chocolate
100 grams milk chocolate
1 tsp. cinnamon

For the topping

75 grams white chocolate
1 tbsp. golden syrup
1/2 tsp. of cinnamon

Method

  1. Add the flour, salt, cocoa and cinnamon into a large bowl.
  2. Rub in the butter to the flour mixture.
  3. Make a well and add in the honey, sugar and yeast.
  4. Beat the egg and add into the mixture.
  5. Heat the milk in a microwave for about a minute (until it is slightly warmer than room temperature) Add the milk into the mixture and mix together to form a dough.
  6. On a lightly floured surface, turn out the dough and flatten as much as you can.
  7. Add half the white chocolate and milk chocolate and work into the dough.
  8. Flatten the dough out again and work the rest of the chocolate into the dough.
  9. Knead the dough for approximately 5 minutes until it is smooth and elastic.
  10. Shape the dough into a ball shape.
  11. Grease the large bowl with butter and add the dough into the ball.
  12. Cover with a clean tea towel and place the bowl in a warm place for an hour to prove.
  13. After an hour, place the dough on a lightly floured surface and knock back ((??)) the dough.
  14. Shape it into a ball and place back into the bowl, cover with the tea towel and leave to rise for a further 30 minutes.
  15. After 30 minutes, turn the dough out onto a lightly floured surface, divide the mixture in two, roll out each of the two parts and divide each part into 6 equal pieces.
  16. Roll each piece into a ball and then flatten slightly to make a bun shape.
  17. Cover the 12 buns and leave to rest for 5 minutes.
  18. Grease a baking tray with butter (I greased two smaller baking trays as my oven isn’t that big) and add the buns to the tray(s).
  19. Completely cover the buns with cling film and leave to rise for 40 minutes Preheat the oven to 230C/gas 8. (I put my oven on about 15 minutes before I put the buns in the oven.)
  20. Place the buns in the oven for 10 minutes.
  21. While the buns are baking, place the golden syrup into a bowl and stir.
  22. Heat the golden syrup up in the microwave for 10-15 seconds.
  23. As soon as the buns are ready, brush the golden syrup over the buns, then place them on a wire rack to cool.
  24. After they have cooled, melt the white chocolate. To melt, I chop up the chocolate, place it into a microwaveable bowl and heat for 20 seconds at a time until just melted. In between each 20 second interval, I stir the chocolate making sure the mixture does not get too hot.
  25. Once melted, add to a piping bag and pipe a cross on each bun.
  26. Leave the chocolate to set  and serve!

Suzy says:

  • The buns taste good straight from the oven. But please remember to cool slightly before eating- ‘hot’ should not be taken too literally!
  • If you do not like cinnamon then feel free to leave this out.
  • Use dark chocolate, if you prefer it to milk. The chocolatier the better!
  • The buns taste good with butter spread over them.
  • The only difficult part to this recipe is the kneading of the dough as it is quite stiff.

………….No jokes please about buns in the oven!!

Bon appetit!

Simply Suzy’s Cookies

Sometimes me think, ‘What is friend.’ And then me say, ‘friend is someone to share last cookie with’  (Cookie Monster)

Simply Suzy's Cookies

Simply Suzy’s Cookies

As you might have guessed, I am the office baker (or depending on the day, the feeder or enabler!) and I bring in goodies almost every week for my colleagues. But every now and again, someone else turns up with a recipe of their own which is so delicious, I just have to try it out myself! This is a great example.

A friend of mine brought some cookies to work that she had baked – they were the best I have ever tasted and I had to ask her for the recipe. She originally used Smarties in the recipe but she also tried it with Minstrels (one of my favourite sweets), which worked brilliantly so this is what I have used in the recipe below.  You can of course experiment with other sweets and chocolates of your choice; personally, I think chocolate always works best!

{This recipe also acts as the base to my delicious chocolate orange brownie and white chocolate cookie cake}

Simply Suzy’s Cookies

(Makes 12 -14)

Ingredients

114 grams butter
114 grams of sugar (I use a mix of caster sugar and soft brown sugar)
1 tbsp. golden syrup
170 grams self raising flour
85 grams Minstrels

Method

  1. Preheat the oven to 180C/gas 4
  2. Line two baking trays with grease proof paper.
  3. Cream the butter and sugar together, then stir in the golden syrup.
  4. Mix in half the flour.
  5. Add the rest of the flour and the Minstrels, mix and then knead together.
  6. Divide the mixture into apricot sized balls and place them on the baking tray, ensuring you space them apart. You should fit about 6 balls onto one baking tray.
  7. Place in the oven for 12 minutes until they turn golden around the edges.
  8. Leave to cool and transfer onto a cooling rack.

Suzy says

  • Try adding chopped up white chocolate to the recipe instead of minstrels – delicious!
  • Great with a tea or coffee, of course!
  • And if you have the ingredients in your cupboard, the cookies can be done in the time it takes to drive to the supermarket and back!

Bon Appetit!

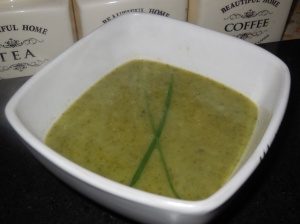
Soup of the Week

I always think if you cook once, you should feed twice. If you’re going to make a big chicken and vegetable soup for lunch on Monday, you stick it in the refrigerator and it’s also for Wednesday’s dinner. (Curtis Stone)

This week I decided to spend as little as possible on my weekly shop. I made an effort to use up what I could from my food cupboard/ refrigerator and create recipes using these ingredients. These cost-effective concoctions can still taste great, as well as being good for your health and your purse!

One recipe I often use towards the end of a week, is what I like to call my “soup of the week”. It is rustled up using a medley of any leftover vegetables I have in the fridge or freezer. I fry the chopped vegetables in some butter, pour in boiling water as well as any herbs I feel may go with the soup, add a stock pot, blend….et voila! I have been very fortunate with this dish as I can’t remember a time it hasn’t worked, no matter what the ingredients. This week was no exception.

Soup of the Week (serves 2-4 or maybe more, depending on how much vegetables you have left!)

Ingredients

Soup of the Week

Soup of the Week

1/2 onion
1 apple
2 celery sticks
2 large leeks
1/2 bag of kale
1 clove of garlic
1 chicken Knorr stock pot (vegetable stock also would work)
coriander and parsley (if fresh add 1 tbsp. of each or if dried add 1tsp. of each)
1 tbsp. butter
chives for decoration
salt and pepper to taste

Method

  1. Finely chop the onion, garlic and celery into small pieces Chop the leek into small pieces and wash in a colander with the kale.
  2. Peel and chop the apple into small pieces.
  3. Melt the butter in a saucepan on a low heat.
  4. Once melted add all the vegetables (including the apple and garlic) and stir.
  5. Place the lid onto the saucepan and sweat down the vegetables for 10/15 minutes.
  6. Pour some boiling water over the vegetables so it just covers them.
  7. Add the stock pot and the herbs and bring to the boil.
  8. Simmer for a further 20 minutes or until the vegetables are soft.
  9. Add salt and pepper to taste.
  10. You can eat the soup as it is or you can blend to make a smooth consistency. You may need to add more boiling water at this point.
  11. To decorate I snip a couple of chives and add to the top of the soup.

Suzy says:

  • Blending can sometimes change the taste of the soup and therefore you may choose to leave it just as it is.
  • I often add a can of washed and drained chickpeas to the soup for protein.
  • As yet, I haven’t found a vegetable or salad ingredient that doesn’t work in this soup, including lettuce and cucumber, which taste great and add a distinctive, fresh flavour. Plus, I always seem to have these leftover!
  • Sometimes your soup may not need any stock, especially if it’s packed with veg (or if you use herbs)- so try it first before you add any in.
  • I always have fresh herbs in my kitchen for my cooking- I keep them in the freezer and they are just as fresh and delicious when I come to use them.
  • Lastly, if you end up making more than is needed, the soup can be frozen to use at a later date.

Bon Appetit!