Banana Cake

Let them eat cake (Marie Antoinette)

Banana Cake

Banana Cake

I love using bananas in my baking and so this week, I opted to make the most of my overripe fruit bowl! I hope you like the recipe.

Banana Cake

Makes around 12 slices

Ingredients

285 gr. plain flour
1 tsp. baking powder
110 gr. butter
100 gr. caster sugar
115 gr. soft brown sugar
2 free range large eggs
4 ripe bananas
85 ml natural Greek yoghurt
1 tsp. vanilla extract

Method

  1. Preheat the oven to Gas 4/180C/350F.
  2. Grease a 20cm loaf tin.
  3. In a large bowl, cream together the butter and sugar until light and fluffy.
  4. In a separate bowl, mash the bananas with the yoghurt and vanilla essence, then stir into the butter and sugar mixture.
    Add the eggs and mix well.
  5. Fold in the flour and baking powder until well incorporated.
  6. Pour the mixture into the loaf tin.
  7. Place into the oven for about an hour or until well risen and golden.
  8. Take out of the oven and leave in the tin for a few minutes before turning it out onto a cooling rack.

Suzy says

  • No need to ice the cake, it is lovely just as it is!
  • If you have any more overripe bananas, chop them up and put them in the freezer to make my Suzy sorbet 🙂


Simply Suzy’s Cookies

Sometimes me think, ‘What is friend.’ And then me say, ‘friend is someone to share last cookie with’  (Cookie Monster)

Simply Suzy's Cookies

Simply Suzy’s Cookies

As you might have guessed, I am the office baker (or depending on the day, the feeder or enabler!) and I bring in goodies almost every week for my colleagues. But every now and again, someone else turns up with a recipe of their own which is so delicious, I just have to try it out myself! This is a great example.

A friend of mine brought some cookies to work that she had baked – they were the best I have ever tasted and I had to ask her for the recipe. She originally used Smarties in the recipe but she also tried it with Minstrels (one of my favourite sweets), which worked brilliantly so this is what I have used in the recipe below.  You can of course experiment with other sweets and chocolates of your choice; personally, I think chocolate always works best!

{This recipe also acts as the base to my delicious chocolate orange brownie and white chocolate cookie cake}

Simply Suzy’s Cookies

(Makes 12 -14)

Ingredients

114 grams butter
114 grams of sugar (I use a mix of caster sugar and soft brown sugar)
1 tbsp. golden syrup
170 grams self raising flour
85 grams Minstrels

Method

  1. Preheat the oven to 180C/gas 4
  2. Line two baking trays with grease proof paper.
  3. Cream the butter and sugar together, then stir in the golden syrup.
  4. Mix in half the flour.
  5. Add the rest of the flour and the Minstrels, mix and then knead together.
  6. Divide the mixture into apricot sized balls and place them on the baking tray, ensuring you space them apart. You should fit about 6 balls onto one baking tray.
  7. Place in the oven for 12 minutes until they turn golden around the edges.
  8. Leave to cool and transfer onto a cooling rack.

Suzy says

  • Try adding chopped up white chocolate to the recipe instead of minstrels – delicious!
  • Great with a tea or coffee, of course!
  • And if you have the ingredients in your cupboard, the cookies can be done in the time it takes to drive to the supermarket and back!

Bon Appetit!

Mini White Chocolate Cheesecakes and Ice-Cream

Because you don’t live near a bakery doesn’t mean you have to go without cheesecake  (Hedy Lamar)

??????????

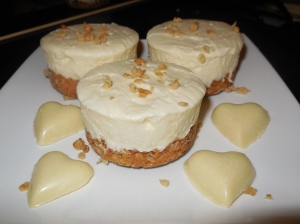
White Chocolate Cheesecakes

Mmmm cheesecake! Who doesn’t love cheesecake? In fact, for me Christmas just doesn’t feel right without it. When I was growing up we spent every Christmas at my aunt’s house and she always made Delia’s fresh lemon cheesecake with frosted grapes. It is a fabulous dish and I looked forward to it every single year. I will always remember the anxiety it caused my aunt, who hoped that the cheesecake set and it wasn’t a flop. It never was! This cheesecake was also the first ever dish I made for my husband (boyfriend at the time). I think a way to a man’s heart is definitely through his stomach!

The following recipe does not use gelatine so no need to worry about the dish flopping over. Instead of using a digestive biscuit base, in line with lots of recipes I have seen, I made a gluten-free flapjack base, which seems to work quite well too. When I tried making the cheesecakes in a 12 cup mini sandwich tin, I had leftover mixture so I decided to make white chocolate cheesecake ice-cream with it.

Mini White Chocolate Cheesecakes and White Chocolate Cheesecake Ice-Cream

Ingredients (makes 12 mini cheesecakes or one big cheesecake)

For the flapjack bases

250 grams oats (gluten-free oats for those who would like to make this a gluten-free dish)
100 grams melted butter
50 grams of caster sugar
3 tbsp. honey

For the cheesecake mixture

200 grams white chocolate
325 grams of cream cheese (Philadelphia works well)
100 grams caster sugar
500 ml double cream
1 tbsp. honey

Method

  1. Preheat the oven to 190C /gas 5/375F
  2. For this recipe I used a 12 cup loose based mini sandwich tin. If you do not have this you can use a lightly greased 20 cm loose based tin instead.
  3. To make the flapjack mix for the bases, place 250 grams of oats in a bowl.
  4. Add the melted butter, caster sugar and 3 tbsp. of honey to the oats and stir until all the oats are covered.
  5. Add a heaped tbsp. of flapjack mixture to one of the bases and press down with the back of a teaspoon or an end of a rolling-pin. Repeat for the other 11 bases. You should have a thickness of about 1/2 cm in each base or more if preferred.
  6. Place into the preheated oven for 10 minutes. (I had some flapjack mixture leftover so I scattered this in a spare tin and placed it in the oven along with the sandwich tin. This will be used to cover the ice-cream later on so this is important.)
  7. After 10 minutes, take both tins out of the oven and leave to cool.
  8. In the meantime, on the lowest hob setting, melt 200 grams of white chocolate and 100ml of cream in a saucepan. Stir until the mixture is completely blended. Take off the heat and leave to cool.
  9. Place the cream cheese in a bowl.
  10. Add the remaining cream, chocolate mixture, sugar and honey and beat until well blended. At this point the mixture should have thickened.
  11. Add the cheesecake mixture to each of the 12 bases and level off the surface.
  12. Cover the tin with cling-film and place in the fridge for at least 3 hours.
  13. Take the cheesecakes out of the tin and eat!
  14. With any leftover cheesecake mixture,  place in to a container and then in to the freezer over night to make the ice-cream. To serve, spoon some ice-cream in to a bowl and scatter over some of the leftover flapjack mixture. This is not as soft as normal ice-cream so you may have to take it out of the freezer and leave before you can spoon it out.

As this mixture uses double cream and white chocolate, I even made some white chocolate cheesecake truffles from the leftover cream and cream cheese.

White Chocolate Cheesecake Truffles

Ingredients for the Truffles

200 grams white chocolate
100 ml double cream
75 grams cream cheese
1/2 tbsp. honey

Decoration

White Chocolate Cheesecake Truffles

White Chocolate Cheesecake Truffles

Leftover toasted oats from the flapjack recipe above or you can crush some digestive biscuits as well.

The method on how to make truffles can be found in my first blog post here: https://simplysuzyblog.wordpress.com/2014/02/18/baileys-truffles/    Instead of adding the Baileys to the truffle mixture, add the cream cheese and honey. After the mixture is chilled and hardened, you can roll it into balls and cover them with the leftover toasted oats.

Please give this a go and I would love to know how you get on.

Enjoy!

Baileys Truffles

I was 32 when I started cooking; up until then, I just ate. (Julia Child)

This has been such an exciting week!  I have joined twitter (@SuzyJMills), signed into Pinterest and am now writing my first blog post, it’s daunting….but I hope you will enjoy.

meMy name is Suzy, welcome to my food blog!!!!

I draw inspiration for my recipes from everyday life, reading magazines, recipe books and online journals, adding in my own tweaks to suit my culinary palate.

In a way I can relate to the above quote. I didn’t start getting serious about cooking until I was 29. Even then, my inspiration originated from simple beginnings – I can recall the first time I realised I wanted to learn more, prompted by the chocolate moulds and recipe book my husband got for his birthday. I love chocolate and I love Baileys and when I looked through the recipe book and I saw a recipe for truffles that used exactly these ingredients, I just had to make them. This made me very happy. The great thing about this recipe is that it is simple, far more straightforward than other truffle recipes I have seen since. This is why I have called my blog Simply Suzy. I love making simple and tasty treats and I want to share these recipes with you.

I have to say, after 5 years, Baileys truffles are still my favourite thing to make and I could probably make them in my sleep! I have played around with the recipe and used dark, milk and white chocolate, either grated or melted over the mix. I have experimented with different brands of chocolate. I tried Cadburys and Galaxy, but finally ended up using chocolate from Aldi. You can use whichever chocolate you like of course. I found that using cheaper supermarket brand chocolates means you normally need less cream in the recipe, but they can still be used.

Baileys Chocolate Truffles

Truffle mix (makes 20-30 truffles)

200 grams of milk, white or dark chocolate
4 tbsp. double cream or 6 tbsp. if not using liqueur.
2 tbsp. Baileys (or any other liqueur you wish to use)

Decoration

200 grams dark, milk or white chocolate to cover truffles

Method

1. Chop up 200 grams of chocolate and place it in a non-stick pan.
2. Add 4 tbsp. cream to the pan and heat the mixture on the lowest setting.
3. Keep stirring the chocolate until just melted, making sure the pan does not get too hot. Take off the heat.
4. Add the liqueur or extra 2 tbsp. of cream and stir until incorporated.
5. Pour into a clean bowl and leave until cooled.
6. Cover and keep in the fridge overnight.
7. The mixture should be quite hard at this point. Roll a teaspoonful of mixture into a ball and place into another bowl. (I use food gloves for this as it can get quite messy)
8. Repeat this process until the mixture has gone.
9. Stick in to the fridge again to harden. At least 2 hours.

Here is where you can be creative.

10. Grate the chocolate leftover for decoration into a bowl. (This can be a different chocolate to the truffle mixture.)
11. Take the mixture out of the fridge and re-roll to melt slightly and drop it into the grated chocolate. Roll around until the truffle is fully covered and leave on baking paper.

Instead of using grated chocolate, you can melt chocolate over the truffles as well. Again after rolling the truffle in the melted chocolate, place them on to baking paper to set. To melt, I chop up the chocolate and place it into a microwaveable bowl and heat for 20 seconds at a time until just melted. In between each 20 second interval, I stir the chocolate making sure the mixture does not get too hot. There will be more on tempering chocolate in a later blog. Watch this space!

12. After the chocolate has set, you can put in to a presentation bag to give to someone as a present or leave out on the table for people to scoff during a party

Baileys Chocolate Truffles

Baileys Chocolate Truffles

For me, food is a way of life. I love spending time in the kitchen and creating recipes I can call my own. I enjoy making the naughty and the nice, especially cakes and ice-cream, but I have also created healthy recipes that are equally delicious and will be sharing these with you too.

Thank you for reading my first blog. I hope you like this recipe. I would love to hear from you so please let me know how you get on.