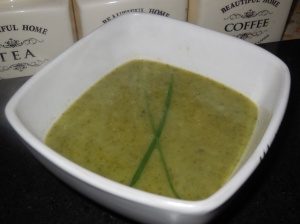
Butternut Squash Soup

Let me be the first to tell you, drinking alcohol is the worst thing to do in cold weather. Hot soup is the best because the process of digesting food helps to warm you up. (Morgan Freeman)

Butternut Squash Soup

Butternut Squash Soup

This week, Butternut Squash soup was top of the menu in the Mills household! It is the perfect dish for a cold, Autumnal evening and really quick and easy to make. I love soups to be as thick as possible; when I was young I used to have a Dutch pea soup that was so thick, you could stick a spoon in and it would be held up! I would love to hear what your favourite flavours are, the more unusual the better! Here is my recipe:

Butternut Squash Soup

Serves 4

Ingredients

2 tbsp. butter
2 medium sized butternut squash
1 small onion
1 medium sized leek
1 small sweet potato
1 chicken/Vegetable Knorr stock pot.
Water to cover the vegetables
1 tsp. turmeric
1 tsp. curry powder
1 tsp. garam masala
2 tbsp. milk
Salt and pepper to taste

Method

  1. Chop up the butternut squash, onion, leek and sweet potato to small pieces (small enough to be blended afterwards)
  2. Melt the butter in a large saucepan on a medium to high heat and add the chopped up vegetables. Stir the vegetables so they are covered fully in the butter.
  3. Turn down to the lowest heat, place a lid on the saucepan and let it reduce for 10 minutes.
  4. Add boiling water to the vegetables, just enough to cover the vegetables.
  5. Add the stock pot to the boiling water.
  6. Leave to simmer for 10-20 minutes or until the vegetables are soft.
  7. Add the milk and stir
  8. Blend with a hand blender until smooth.
  9. Serve.

Suzy Says:

  • Try experimenting and adding any other vegetables.
  • You can leave out the curry powder and turmeric, I just like to add spice to my soups.

Winter Greens Pasta in a Creamy Mint Sauce

Winter Greens Pasta in a Creamy Mint Sauce

Winter Greens Pasta in a Creamy Mint Sauce

No man is lonely eating spaghetti; it requires so much attention. (Christopher Morley)

I don’t know if you are the same but sometimes I get fed up of preparing the same meals each week and so challenge myself to try something completely different with the ingredients I have in stock. During winter, I find myself increasingly hankering for warm and wholesome dishes and this has become one of my recent favourites (particularly when served with a warm bread roll- delicious!) I came up with this recipe and we both adored it so I hope you like it too.

Winter Greens Pasta in a Creamy Mint Sauce

Serves 4

Ingredients

1 large courgette
1\2 a large leek
2 handfuls of frozen peas
A little butter for frying
300 – 400 gr of Spaghetti
100 gr soft cream cheese
2tbsp. mint sauce
Salt and pepper to season

Method

  1. Put a pan of water on to boil. Once the water is boiled, add the spaghetti and cook to the packet’s instructions. I normally break the spaghetti in half before putting it in the pan.
  2. Chop up the courgette and leeks into long thin slices, as thin as you can get them
  3. Melt some butter into a large frying pan or wok on a medium heat and then add the courgettes and leek and fry until soft.
  4. In the meantime, microwave the frozen peas to your packet’s instruction and add to the wok once they are ready.
  5. In a small bowl, mix the cream cheese and mint sauce together.
  6. Turn the heat down on the pan and add the cream cheese mixture.
  7. Stir the cream cheese mixture into the vegetables until it becomes a creamy sauce texture.
  8. Once the pasta is ready, drain and add to the frying pan.
  9. Mix until it has all combined.
  10. Season with salt and pepper to taste. I tend to add a lot of black pepper.

Suzy says:-

  • If you want more of a minty taste, just add more mint sauce
  • You could also experiment with different tastes, such as lemon or garlic or different herbs
  • If you want to reduce the calorific content, you could try using a fat free Greek yoghurt.

Vegetarian Quiche

Laughing. Yummy Cupcakes. Getting together….. and helping familys affected by cancer (Macmillan Cancer Support)

Vegetarian Quiche

Vegetarian Quiche

Wow….I can’t believe it’s been so long since I wrote my last post. What have I been doing, I hear you ask!? Well to be honest, I have taken a break from baking but hopefully that will change very soon.
It all starts again with the work Bake Off today. To make the most of my recent impetus, I have decided to try a new recipe and not a tried and tested one. Do you think that is the right thing to do? Well, we shall see. It is all for a good cause; Macmillan Cancer Support – Worlds biggest coffee morning.
If the cupcakes I bake do well, I will share the recipe with you. If not, I will have to go back to the drawing board.
Today, I would like to share my vegetarian quiche recipe with you. It is easier than you may think. I hope you like it.

This recipe requires you to have at least 2 loose-based tartlet tins of around 12cm.

Vegetarian Quiche

makes 4 small quiche’s

Ingredients

140 gr. rice flour
140 gr. plain flour
90 gr. butter
8-10tbsp. cold water
140 ml double cream
2 eggs
Salt and pepper to season
150-200 gr cheese, grated
Half a red onion
1 tomato
Half a medium courgette
3-4 grilled artichokes from a jar
5 small mushrooms
Half a large red pepper
Some oil for frying

Method

  1. To make the pastry, mix the two flours in a large bowl, add the butter and rub into the flour with your fingertips until it resembles breadcrumbs.
  2. Add the cold water 1 tbsp. at a time until the flour comes together to form a dough.
  3. Cover the dough in Clingfilm and leave in the fridge for at least 20 minutes, but longer if you have the time.
  4. Once the pastry is ready, divide into 4 equal pieces.
  5. Preheat the oven to 190C / gas 5
  6. Roll out each piece until it is slightly larger than your tin. I only have two tartlet tins, so I make 2 the first day and then 2 the following day.
  7. Lift the pastry into the dish and press into the bottom and sides.
  8. Trim the pastry that overlaps the dish to neaten the edges.
  9. Prick the bottom of the pastry several times with a fork.
  10. Tear off a piece of baking paper to the size of the tartlet tin and place onto the pastry. Add baking beans on top of the baking paper. If you don’t have baking beans, you can use some uncooked rice instead.
  11. Bake in the oven for 10 minutes.
  12. After the pastry case’s come out of the oven, remove the baking beans and baking paper and put the pastry in the oven for a further 5 minutes.
  13. Whilst the pastry is in the oven, whisk the eggs and double cream together in a big measuring jug.
  14. Chop up the vegetables as small as possible and lightly fry the ingredients in a frying pan until soft. You do not need to fry the tomatoes.
  15. Once the pastry case’s are out of the oven, add a layer of cheese so it lines the base.
  16. Spoon your fried veg and chopped tomatoes and fill the pastry cases to almost the top, leaving enough space to add another layer of cheese.
  17. Pour over the egg mixture so it fills the quiche. Leave about 5mm gap at the top.
  18. If you would like to put a decoration on the top, you could add slices of mushroom or tomatoes.
  19. Put the dishes in the oven for a further 30 minutes or until golden brown and firm to touch.

Suzy says:

  • These are great to eat cold at a picnic or heated up in the microwave to eat at work
  • Add a cold carrot salad with the quiche, delicious.

Bon Appétit

Bolognese Pasta Bake

Penne for your thoughts (unknown)

I’ve been experimenting with new recipes which still need some tweaking before I post them.  In the meantime, try my Bolognese Pasta Bake:

Bolognese Pasta Bake

(Serves 6)

Ingredients

Bolognese Pasta Bake

Bolognese Pasta Bake

200-250 gr. turkey mince
1 tbsp. tomato ketchup
1 chicken Knorr stock pot
1-2 tbsp. dried basil
Approximately 150 grams frozen mixed peppers
1 large carrot
1 large courgette
1 clove of garlic
1/2 an onion
2 x 400 gram cans of peeled plum tomatoes
1-2 tbsp. tomato purée
A little oil for frying
Salt and pepper
300 gr. Gluten Free penne pasta
Approximately 50-100 grams of cheese

Method

  1. Start by heating some oil in a high sided large frying pan.
  2. Whilst the oil is heating up, mix the tomato ketchup, chicken stock pot, 1 tbsp. of dried basil, some salt and pepper into the turkey mince until well incorporated. (I wear food gloves and mix with my hands.) Don’t overwork the meat.
  3. Add the turkey to the pan and chop up as much as you can with a wooden spoon so the mince covers the pan.
  4. Leave it to cook for a few minutes and keep turning it until it browns.
  5. Add the peppers to the pan and leave to cook In the meantime chop the carrots, courgette and onion into small pieces and add to the pan Crush and chop the garlic as small as you can and add to the pan.
  6. Fry the veg for about 10 minutes.
  7. Blend the two cans of peeled plum tomatoes and add to the pan.
  8. Cook for five to ten minutes until it has reduced slightly.
  9. Preheat the oven to Gas 4/180C/350F.
  10. While this is reducing, place the pasta in a pan of boiling water and boil for approximately 10 minutes, until al dente.
    Spread half the pasta into a Pyrex dish.
  11. Ladle over half the bolognese mixture and grate some cheese over the top Add the rest of the pasta then bolognese and another layer of grated cheese.
  12. Place in the oven for 25 minutes
  13. Once out of the oven, you can portion into 6 servings.

Suzy says

  • Enjoy with a nice salad
  • This meal is great as a lunch.

Lentil Curry with Chutney and Salad Mini Wrap Rolls

One cannot think well, love well, sleep well, if one has not dined well (Virginia Woolf)
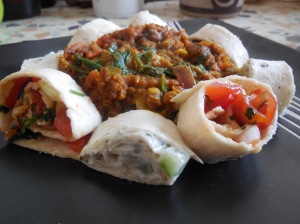
Lentil Curry with Chutney and Salad Mini Wrap Rolls

Lentil Curry with Chutney and Salad Mini Wrap Rolls

Week 3 of my ‘World Cup Workout’ and I am already starting to feel the benefit! I feel more toned and my energy levels are on the up 🙂 Although I have still got a long way to go, I have to say I am really enjoying the exercises!

Sticking with the healthy theme,  the dish I have chosen this week is Lentil Curry. Although it is a guilty pleasure, I love having poppadoms and chutney with a takeaway curry. Sometimes I buy the ready-made poppadoms from the supermarket and whip up some homemade chutney to go on the side. This time, I decided to make some of the chutneys you would use with poppadoms, wrap them in a tortilla and slice into mini bites to eat with the curry. This means you don’t need to serve the curry with rice.

Lentil Curry with Chutney and Salad Mini Wrap Rolls

(Serves 4)

Ingredients

250 grams red lentils (follow the cooking instructions on the packet.)
1 large carrot
1 large courgette
1/2 a medium red onion
100 grams fresh spinach
1 tbsp. fresh coriander
For the curry paste
1 tbsp. garam masala
1 tbsp. mild curry powder (you can opt for a hotter one)
1 tsp. fenugreek
1 tsp. cumin seeds
1 tsp. turmeric
1 tsp. cinnamon
1 tsp. ground coriander
1 tbsp. sugar
1 tsp. lemon juice
1 tbsp. tomato purée mixed with half a mug of hot water.
1 tbsp. oil

For the mini wrap salad and relish rolls

100 grams of cherry tomatoes
1/2 small red onion
8cm piece of cucumber
3 tbsp. plain yoghurt
1 tsp. mint sauce
2 tbsp. mango chutney
1 tbsp. fresh coriander

Method

  1. Cook the lentils as per the cooking instructions on the packet.
  2. Whilst the lentils are cooking, chop the carrots, onion, garlic and courgettes into little pieces and fry in a large frying pan until soft.
  3. In a separate high sided frying pan, add the garam masala, curry powder, fenugreek, cumin seeds, turmeric, cinnamon and ground and heat on a low heat until you can smell an aroma (approximately 3-5 minutes) keep stirring so it doesn’t burn.
  4. Next, add the tomato purée, oil, sugar and lemon juice to make the paste.
  5. Drain the lentils and add to the curry paste and stir so the paste covers all the lentils Add the cooked vegetables and stir until fully incorporated
  6. For the mini wrap salad and relish rolls Chop the onion, cucumber and cherry tomatoes into little pieces. When chopping the tomatoes, just use the skin and take out the pulp.
  7. Keep aside a third of the cucumber.
  8. Mix the tomato, thenrest of the cucumber and onion together into a small bowl.
  9. In another small bowl, add three tablespoons of yoghurt. Add the mint sauce and stir to make your mint yoghurt sauce and add the cucumber you have kept aside into the bowl with the yoghurt.
  10. Take two tortilla wraps and spread over the mint yoghurt mixture over both wraps Roll into a tight roll and slice into small pieces.
  11. Take the other two tortilla wraps, spread the mango chutney over them and spoon over the onion, tomato and cucumber mix. Sprinkle some fresh coriander over, roll up and slice into mini wrap pieces.
  12. To serve, place some curry onto the middle of the plate and place the mini wraps around the edge. Finally sprinkle the rest of the fresh coriander over the curry.

Suzy says:

  • Experiment with your relishes. My husband likes the lime pickle, which would definitely give the wraps some spice!
  • This curry also works with chickpeas instead of lentils.

Bon appétit!

Suzy’s Spag Bol

Suzy's Spag Bol

Suzy’s Spag Bol

Everything you see I owe to spaghetti. (Sophia Loren)

It’s an age-old favourite and I am sure you all have your own tweaks (which I would love to hear about!) but please do take a look at my version. I have made it healthier by using turkey mince and a selection of my favourite vegetables. My husband uses gluten free pasta with his. It is also a great for a packed lunch and you can make a big batch and freeze in advance for the working week ahead.

Suzy’s Spag Bol

(Serves 6)

Ingredients

500 gr. turkey mince
2tbsp. worcester sauce
2 tbsp. tomato ketchup
1 chicken Knorr stock pot
1-2 tbsp. dried basil
Approximately 220 grams frozen mixed peppers
1 large carrot
1 large courgette
1 clove of garlic
1/2 a large onion
2 x 400 gram cans of peeled plum tomatoes
1-2 tbsp. tomato purée
A little oil for frying
Salt and pepper

Serve with approximately 75-100 grams of pasta of choice (follow cooking instructions on packet)

Method

  1. Start by heating some oil in a high sided large non-stick frying pan.
  2. Whilst the oil is heating up, mix the Worcester sauce, tomato ketchup, chicken stock pot, 1 tbsp. of dried basil, some salt and pepper into the turkey mince until well incorporated. (I wear food gloves and mix with my hands.) don’t overwork the meat too much.
  3. Add the turkey to the pan and chop up as much as you can with a wooden spoon so the mince covers the pan.
  4. Leave it to cook for a few minutes and keep turning it until it browns.
  5. Add the peppers to the pan and leave to cook. In the meantime chop the carrots, courgette and onion into small pieces and add to the pan.
  6. Crush and chop the garlic as small as you can and add to the pan.
  7. Fry the veg for about 10 minutes.
  8. Add the two cans of plum tomatoes, break up the tomatoes with a wooden spoon and stir so all the veg are covered in the tomato sauce.
  9. Add the tomato purée. (At this point you may wish to add more basil, tomato ketchup, salt and pepper but that will be down to your own taste!) If the veg are not covered, add some more water.
  10. Leave to simmer until the sauce has reduced down as much as possible, stirring occasionally. At this time the sauce will cling to the meat, forming the thick Bolognese that you are used to enjoying.
  11. Serve with your cooked pasta of choice.

Suzy says:

  • Sprinkle some cheese over the mixture and as a treat make your own garlic bread to eat with your meal. You can make this by mixing finely chopped garlic with butter and spread over toast (add a bit of parsley if you like).
  • I always use food gloves so my hands don’t get too messy!
  • I also make a vegetarian version using Quorn mince and a vegetarian stockpot. I take out the Worcester sauce (as it contains anchovies) and add some more basil and parsley.

PS. Enjoy!!

Falafel Burgers

There are three reasons why this book came into being. First, throughout the 33 years I’ve been writing recipes – although I’m not vegetarian myself – I have greatly enjoyed creating vegetarian recipes, and cooking and serving them at home. (Delia Smith)

Falafel Burgers

Falafel Burgers

It was National Vegetarian Week a couple of weeks ago and this seemed like the perfect opportunity to do some experimenting. My favourite dish I created over the course of the 7 days was my falafel burgers. They are really easy to make – as long as you have a blender or food processor! Here is the recipe.

Falafal Burgers

(Serves 2)

Ingredients

For the burger

1 x 400 gr. can of chick peas, rinsed, drained and patted dry with some kitchen roll
1/2 a red onion, chopped as small as possible
1 stalk of celery, chopped as small as possible A handful of chopped fresh parsley or coriander
6-10 sun dried tomatoes
1 clove of garlic, crushed and chopped small
1 tsp. ground coriander
1 tsp. cumin seeds
2 tbsp. oil
2 tbsp. rice flour
1 tsp. chopped fresh red chilli (you can leave this out) Salt and pepper

For the bun

2 tbsp. mango chutney
2 tortilla wraps

extra oil for frying

Method

  1. Add all the ingredients for the burger into a food processor and blend until smooth. (This may take a while and you may need to stop the blender and push the ingredients down so it all mixes together).
  2. If the mixture is slightly wet, add a little more rice flour Shape into 4 burgers with your hands. They will be the size of a cupcake.
  3. Heat some oil in a non-stick frying pan and fry for 3 minutes on each side or until golden brown.
  4. Heat the wraps up in the microwave for 20-30 seconds.
  5. Spread one tablespoonful of mango chutney on each wrap.
  6. Add two burgers to each wrap and serve.

Suzy says

  • I use food gloves when shaping the burgers.
  • You could add a side salad and some chutney to create a more substantial meal. This would work better for anyone who is on a Gluten Free diet as you would not need the tortilla wraps.

Chocolate Cornflake Cakes

There is nothing better than a friend, unless it is a friend with chocolate (Charles Dickens)

Chocolate Cornflake Cakes

Chocolate Cornflake Cakes

Who would have believed that cornflake cakes would be my first blogger’s hurdle?! Well, it’s only taken me three attempts and although I really wanted to make these as an Easter treat, I have finally managed to produce a batch I am happy with. Thank you to my mother-in-law Carmen from who I have adapted this recipe – I think it is awesome and I hope you agree!

Chocolate Cornflake Cakes

makes 12 cakes

Ingredients

3 full size mars bars
50 gr. milk chocolate
85 gr. margarine
114 grams cornflakes
2 packets of Smarties

Method

  1. Place 12 cupcake cases into a muffin tin.
  2. Chop up the mars bars and put them in a saucepan with the butter.
  3. On the lowest heat setting, stir until melted. (You may need to take the pan off the heat and stir until fully incorporated
  4. Add the cornflakes into a bowl and stir in the melted chocolate until all the cornflakes have been covered.
  5. Using your hands make 12 cornflake balls and place them in the cupcake cases.
  6. Add three Smarties on top of each cupcake case.

Suzy says:-

  • At Easter time, you can try using mini eggs instead of Smarties.
  • I tried the mixture with bran flakes after my first successful attempt and they were awesome too!
  • I use my hands to cover the cornflakes with chocolate but always wear gloves (to keep my skin young and beautiful!)

Bean Casserole

Dieting is the only game where you win when you lose (Karl Lagerfeld)

This week I have chosen a simple, tasty and healthy recipe to share with you. Here it is:

Bean Casserole

Serves 4-6

Ingredients

Bean Casserole

Bean Casserole

1 x 420 gram can of mixed beans (I use mixed beans in mild chilli sauce by Sainsburys)
2 x 400 gram cans of peeled plum tomatoes
1 x 165 gram can of sweetcorn
1x 425 gram can of baked beans (you can use the value brand for this)
Approximately 220 grams of frozen mixed peppers
1 large carrot
1 large courgette
1 medium onion
1 clove of garlic
2 tsp. Cajun spice
Salt and peppers to taste
1 tbsp. olive oil

Method

  1. In a deep sided large frying pan, heat up the olive oil.
  2. Add the frozen peppers to the pan once the oil is heated.
  3. Whilst the peppers are cooking, chop the carrots, courgette and onion into small pieces and add to the pan.
  4. Crush and chop the garlic up as small as you can and add to the pan.
  5. Fry the veg for about 10 minutes.
  6. Open up all the cans.
  7. First add the can of mixed beans and stir.
  8. Then add the sweetcorn and stir.
  9. Pour the can of beans into a sieve and place under some cold water to wash away the tomato sauce. Add to the pan and stir.
  10. Finally add the two cans of plum tomatoes, break up the tomatoes with a wooden spoon and stir so all the veg are covered in the tomato sauce.
  11. If the veg are not covered, add some more water.
  12. Add the Cajun spice and some salt and pepper to taste.
  13. Leave to simmer for approximately 20 minutes or until you a happy with the consistency.
    Serve.

Suzy says:

  • Eat on its own or accompanied with rice or pasta.
  • If you like spice, add more Cajun or some hot chilli powder.
  • Try sprinkling some grated cheese on it as well. Delicious!

Bon appetit.

Soup of the Week

I always think if you cook once, you should feed twice. If you’re going to make a big chicken and vegetable soup for lunch on Monday, you stick it in the refrigerator and it’s also for Wednesday’s dinner. (Curtis Stone)

This week I decided to spend as little as possible on my weekly shop. I made an effort to use up what I could from my food cupboard/ refrigerator and create recipes using these ingredients. These cost-effective concoctions can still taste great, as well as being good for your health and your purse!

One recipe I often use towards the end of a week, is what I like to call my “soup of the week”. It is rustled up using a medley of any leftover vegetables I have in the fridge or freezer. I fry the chopped vegetables in some butter, pour in boiling water as well as any herbs I feel may go with the soup, add a stock pot, blend….et voila! I have been very fortunate with this dish as I can’t remember a time it hasn’t worked, no matter what the ingredients. This week was no exception.

Soup of the Week (serves 2-4 or maybe more, depending on how much vegetables you have left!)

Ingredients

Soup of the Week

Soup of the Week

1/2 onion
1 apple
2 celery sticks
2 large leeks
1/2 bag of kale
1 clove of garlic
1 chicken Knorr stock pot (vegetable stock also would work)
coriander and parsley (if fresh add 1 tbsp. of each or if dried add 1tsp. of each)
1 tbsp. butter
chives for decoration
salt and pepper to taste

Method

  1. Finely chop the onion, garlic and celery into small pieces Chop the leek into small pieces and wash in a colander with the kale.
  2. Peel and chop the apple into small pieces.
  3. Melt the butter in a saucepan on a low heat.
  4. Once melted add all the vegetables (including the apple and garlic) and stir.
  5. Place the lid onto the saucepan and sweat down the vegetables for 10/15 minutes.
  6. Pour some boiling water over the vegetables so it just covers them.
  7. Add the stock pot and the herbs and bring to the boil.
  8. Simmer for a further 20 minutes or until the vegetables are soft.
  9. Add salt and pepper to taste.
  10. You can eat the soup as it is or you can blend to make a smooth consistency. You may need to add more boiling water at this point.
  11. To decorate I snip a couple of chives and add to the top of the soup.

Suzy says:

  • Blending can sometimes change the taste of the soup and therefore you may choose to leave it just as it is.
  • I often add a can of washed and drained chickpeas to the soup for protein.
  • As yet, I haven’t found a vegetable or salad ingredient that doesn’t work in this soup, including lettuce and cucumber, which taste great and add a distinctive, fresh flavour. Plus, I always seem to have these leftover!
  • Sometimes your soup may not need any stock, especially if it’s packed with veg (or if you use herbs)- so try it first before you add any in.
  • I always have fresh herbs in my kitchen for my cooking- I keep them in the freezer and they are just as fresh and delicious when I come to use them.
  • Lastly, if you end up making more than is needed, the soup can be frozen to use at a later date.

Bon Appetit!