Smoked Mackerel Fishcakes

I carried recipes in my head like maps. (Joanne Harris, Chocolat )


Smoked Mackerel Fishcakes

Smoked Mackerel Fishcakes

I never saw the fascination of fishcakes until very recently when I tried them at a farm shop. I never really liked them – until now that is – and this gave me the inspiration to make them for myself. I have to say, I think the recipe I designed turned out perfectly first time, which is unusual, especially with newly created dishes, so I haven’t experimented much with different combinations. But why mess with perfection?

They are quite simple to make. The awkward part is the washing up, but trust me, it’s worth it! They can be made gluten free with a few tweaks, if needed.

Smoked Mackerel Fishcakes

(serves 4)

Ingredients

For the Fishcakes

170 grams boneless smoked mackerel (I get mine from Sainsbury’s)
250 grams skinless and boneless river cobbler fillet (you could use any white fish as appropriate)
500 grams of potatoes
Bunch of fresh parsley
Bunch of spring onions
1/2 a large red pepper
A large handful of breadcrumbs (gluten free if needed)
1 large egg
Corn flour (enough to coat the fishcakes)
2 tbsp. rapeseed oil (olive oil if you don’t have rapeseed oil)
Enough olive oil for frying
Some milk for mashing the potatoes
Salt and pepper to taste

For the Salad

1 large carrot, peeled and grated
1/2 large red onion, sliced
Section of cucumber, 7cm long, halved and sliced into strips.
Extra virgin olive oil.
A squeeze of lemon juice.
Chilli flakes

For the dip

I use either soy sauce or a sweet chilli dipping sauce (ensure they are gluten free if needed)

Method

  1. Peel, chop and boil the potatoes until soft enough to mash.
  2. Mash the potatoes with rapeseed oil and milk, adding just a little at a time to avoid a runny mixture.
  3. Leave to cool.
  4. Place the cobbler in the oven as per the instructions (for cobbler, gas 6 for 10-12 minutes).
  5. While the cobbler is in the oven, peel the skins off the smoked mackerel and chop into small pieces.
  6. Chop the spring onions, pepper and parsley and stir into the mashed potato.
  7. Take the cobbler out of the over and chop into small pieces.
  8. Stir in the cobbler and smoked mackerel so they are incorporated into the mashed potato.
  9. Add salt and pepper to the mixture.
  10. Shape 8 fishcakes out of the mixture. They should be the approximate size of a muffin.
  11. Place some corn flour onto one plate and breadcrumbs onto another. Whisk the egg in a small bowl.
  12. Take each fish cake and cover it with corn flour, then the whisked egg and finally the breadcrumbs, until well coated.
  13. Heat some oil in a deep sided large frying pan (on a medium to high heat) and fry on each side for approximately 3-4 minutes, or until golden brown.
  14. For the bed of salad under the fish cakes, mix the onion, cucumber and carrot with a tbsp. of rapeseed oil, a squeeze of lemon, a pinch of chilli flakes and some sweet chilli sauce.
  15. Serve with some sweet chilli or soy sauce on the side.

Suzy says:

  • Try adding some fresh red chilli for a bit of a kick.
  • Try making smaller fishcakes and serving them as finger snacks at a party.
  • It is important not to make the mashed potato too runny so remember, add the oil and milk little by little, ensuring you can still shape the mixture easily.

Bon Appétit

Flourless Chocolate Cake

Never be more than 12 steps away from chocolate! (Terry Moore)

Flourless Chocolate Cake

Flourless Chocolate Cake

My husband has suffered from ME for nearly seven years now. Back in 2010, my parents suggested that he should pilot a gluten free diet for a while to see if it would make any difference to his levels of fatigue. We have found this lessens his symptoms to a certain extent and so now we try to avoid gluten whenever possible. I am not saying this will help all people who have ME but it is something that has worked for us.

One of my first attempts to cut out the gluten was a flourless chocolate cake. The recipe I first saw used a lot of icing sugar- too much for my liking, so I experimented with the measurements and added different ingredients like ground almonds and crushed gluten-free cornflakes instead. They all worked! I am determined to carry on experimenting so watch this space…..

Flourless Chocolate Cake (serves 8+)

Ingredients

For the cake mixture

4 large eggs separated
125 grams icing sugar
50 grams ground almonds or an extra 50 grams icing sugar.
100 grams of butter
200 grams of dark chocolate

Decoration

200 grams milk chocolate
200 grams of white chocolate
8 tbsp. double cream plus a bit extra (around 250ml in total)

Method

  1. Preheat the oven to 180C/Gas 4/350F
  2. Take a 20 cm diameter non-stick baking tin and put a circle of baking paper in the bottom.
  3. In a microwaveable bowl, add the 200 grams of chocolate and the butter and heat until melted. Leave to cool. I Microwave the chocolate 15 seconds at a time and stir at each interval, ensuring the mixture does not burn.
  4. In one bowl, whisk the egg whites until it forms stiff peaks.
  5. In another bowl, whisk the egg yolks, ground almonds and icing sugar until incorporated.
  6. Once mixed, fold the chocolate into the egg yolk mixture.
  7. Gradually fold in the egg whites with a metal spoon until there are no white bits. Take it slow and keep as much air in the mixture as possible.
  8. Pour into the baking tin and bake for 30-40 minutes. It is ready when you stick a knife in the cake and it comes out clean.
  9. Take the cake out of the oven and leave to rest before turning it out onto a cooling rack.
  10. To make the ganache icing, melt the white chocolate in a saucepan with 4 tablespoons of double cream. Once it has completely melted, pour into a bowl and leave to cool.
  11. Do the same with the white chocolate.
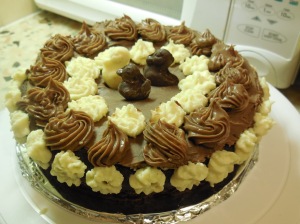
  12. Once cooled, mix some more cream into the mixture until it is loose enough to pipe onto the cake. Design your cake in anyway you like, slice and serve.

Suzy says:

  • The first time I made this cake, I tried whisking the egg whites without an electric whisk. Let’s just say that to form the stiff peaks took some time! So it can be done, but it isn’t advisable.
  • As you maybe can tell, I am no expert with piping but the more I try it, the better I get. One day, I would like to take some courses to perfect my technique but for the time being, I will keep on practising!

Bon Appetit!


Gluten Free Mini Pizzas

The best things in life are meant to be shared  (Lucille and William, Brooklyn)

Gluten Free Mini Pizzas

Gluten Free Mini Pizzas

Have you ever had to rustle up a last-minute buffet and wondered what to make? Then try my Gluten Free mini pizzas! They are ideal as a snack at work or for a quick lunch, if you are travelling in the car.

I like to make these pizzas for Christmas day and have them as a treat in the interim between Breakfast and Christmas Day lunch, which let’s face it, always takes much longer than we think to prepare….! The great thing about this dish is that you can make them in advance; you just need to re-heat in the oven and dish up to your hungry guests!

Gluten free mini pizzas ( makes 30)

Ingredients

For the pizza bases

225 grams gluten free brown bread flour (I use Dove’s Farm but there are alternatives)
1/4 tsp. salt
1tsp. Quick yeast (I use Dove’s Farm)
1 tbsp. sugar
175 ml warm milk
1/2 tsp. vinegar
1 egg
3 tbsp. oil

For the tomato sauce

2 tins of plum tomatoes, blended
1/2 red onion chopped small
1 clove of garlic
2 tbsp. chopped fresh basil
Salt and pepper to taste
Olive oil for frying

For the toppings (ensure you check labelling for gluten free products)

250 grams of Mozzarella, grated.
Pepperoni
1/2 red pepper
1/2 yellow pepper
Or any other topping of choice.

You will also need a round cookie cutter (8 cm diameter)

Method

  1. Start by making the bases.
  2. In a bowl, mix the flour, sugar, yeast and salt.
  3. In a saucepan, on a low heat, warm up the milk and then add the vinegar and eggs. Beat until well mixed.
    Add the milk mixture into the flour and mix well to form a sticky dough.
  4. Start adding the oil 1 tbsp. at a time and mix with each addition. After you have added all the oil, roll it into a ball.
  5. Leave the dough in the bowl, cover with Clingfilm or a clean tea towel and leave to rise in a warm place for an hour.
  6. Whilst the dough is rising you can prepare the tomato sauce
  7. Add some oil into a large frying pan
  8. on a medium heat, fry the chopped onion and garlic in a little oil.
  9. Using a hand blender, blend the tinned tomatoes and add to the onion and garlic. I blend my tomatoes one tin at a time in a measuring jug. If you don’t have a hand blender, you can use passata instead, which is basically the same thing.
  10. Add the basil, salt and pepper and stir.
  11. Turn the heat up on the pan until the mixture starts bubbling and then turn down to simmer and reduce until you have a thick mixture. Last time I made this mixture, it took about 30 minutes to reduce.
  12. Once reduced, leave to cool.
  13. Preheat the oven to 200C/Gas 6/400F
  14. Once the dough has risen, take a large handful of dough and roll it out as thin as possible onto a floured work surface. Make sure you keep turning your dough as you roll so it doesn’t stick to the work surface.
    If the mixture is too sticky, just add some more gluten free flour. This works for me.
  15. Take the cookie cutter and cut out 6 pizza bases. The large handful of dough should make at least 6. I can only fit 6 bases on my baking tray so this works out perfectly for me.
  16. Place the round bases on a baking tray.
  17. Spread a teaspoonful of tomato sauce on each base and the add the pepperoni and peppers to your pizza.
  18. Finally sprinkle some of the grated mozzarella on each pizza and place in the oven and bake for 10 minutes.
  19. Repeat the steps until you have made 30 pizzas. You may be able to cook more pizzas in your oven at one time but I can’t fit more than six in mine.
  20. Take out of the oven and enjoy.

Suzy says:

  • Try with any other toppings of choice.
  • The pizzas taste good straight from the oven or as a cold snack during the day.
  • If you are going gluten-free, ensure you check labels for the logo!

I hope you give this recipe a try and of course, if you do not need to go gluten-free you can also use normal bread flour. However, I would actually go as far to say that it is easier to make gluten-free bread as you do not need to knead your dough as with the flour based recipe and in my opinion, you can’t even tell the difference

Bon Appetit!

Suzy Sorbet (with Raspberries)

If you keep good food in your fridge, you will eat good food. (Errick McAdams)

Suzy Sorbet (with Raspberries)

Suzy Sorbet (with Raspberries)

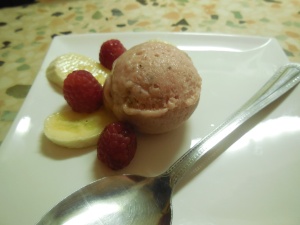
And now for something healthy…..my very own Suzy sorbet! It is prepared without processed sugar or egg whites; in fact, the recipe is simply created from just pure fruit and I have to say it’s delicious. This week I really struggled to come up with a name for my dish (since it has the fruit taste of sorbet with the creamy texture of ice-cream). In the end, I opted for sorbet because it does not have any dairy in it.

If you are wondering how this recipe can taste so delicious, I would say that you would have to try it for yourself! Everyone I have made this for really likes it. It is great for children and adults alike. If you don’t like bananas on their own it’s a great way of hiding them in food and of course, it will count towards your 5 a day!

All that this recipe requires is 4 medium bananas, one other type of juicy fruit and a food processor (you may need some orange juice to add in as well). I have tried this recipe with raspberries, mangos, pineapples, apricots, blueberries and kiwis- my advice is to be experimental! I usually decide on the fruit when I go and see what is on offer at the supermarket which helps to make it as cheap as possible if you are on a budget.

Suzy Sorbet (with Raspberries)

Ingredients

4 medium sized bananas (the riper the better)
1x 150 gram tub of raspberries
(You may need some pure orange juice to hand)

(If you don’t fancy raspberries, I would suggest 1 medium pineapple, 1 punnet of strawberries, 1 tub of blueberries, 4 – 6 apricots, 2 mangos or 6 kiwis)

Method

  1. Cover a baking tray with cling film. I use a 20cm x 30cm tray.
  2. Chop up the bananas into small chunks and place on the baking tray.
  3. Cover the bananas with some more Clingfilm and place into the freezer until frozen (I normally do this 24hrs in advance or I just freeze bananas when they are ripe enough and keep them in the freezer to stop them going off.)
  4. Wash the raspberries and place them in the food processor and blend.
  5. Place a sieve over a big measuring jug.
  6. Pour the raspberries into the sieve and use a spatula to push through as much juice as possible. You should have at least 100 ml of juice. If it is more that is even better.
  7. Rinse the bits out of food processor. You will need to use this again.
  8. Add the frozen bananas and the raspberry juice to the food processor. Blend until smooth, soft and creamy.

Hints:

  • The blending could take a while and you may need to move/shake the processor around to make sure all the banana bits are blended properly.
  • It will be its softest and creamiest when it comes out of the food processor. When frozen overnight, it will be fruitier
  • If the mixture is still a little stiff, here is where you can add a dash of orange juice.
  • Normally, I would use half a tub of raspberries for this recipe but on this occasion, it didn’t produce enough juice so I used the whole tub.

Whatever fruit you are using, it will taste amazing and look lovely and colourful.

I hope to try this recipe with apples one day but if anyone gets there first, please let me know how it turns out.

For now at least raspberries are still my favourite.

Enjoy!

Mini White Chocolate Cheesecakes and Ice-Cream

Because you don’t live near a bakery doesn’t mean you have to go without cheesecake  (Hedy Lamar)

??????????

White Chocolate Cheesecakes

Mmmm cheesecake! Who doesn’t love cheesecake? In fact, for me Christmas just doesn’t feel right without it. When I was growing up we spent every Christmas at my aunt’s house and she always made Delia’s fresh lemon cheesecake with frosted grapes. It is a fabulous dish and I looked forward to it every single year. I will always remember the anxiety it caused my aunt, who hoped that the cheesecake set and it wasn’t a flop. It never was! This cheesecake was also the first ever dish I made for my husband (boyfriend at the time). I think a way to a man’s heart is definitely through his stomach!

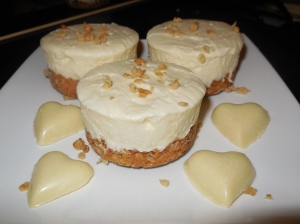
The following recipe does not use gelatine so no need to worry about the dish flopping over. Instead of using a digestive biscuit base, in line with lots of recipes I have seen, I made a gluten-free flapjack base, which seems to work quite well too. When I tried making the cheesecakes in a 12 cup mini sandwich tin, I had leftover mixture so I decided to make white chocolate cheesecake ice-cream with it.

Mini White Chocolate Cheesecakes and White Chocolate Cheesecake Ice-Cream

Ingredients (makes 12 mini cheesecakes or one big cheesecake)

For the flapjack bases

250 grams oats (gluten-free oats for those who would like to make this a gluten-free dish)
100 grams melted butter
50 grams of caster sugar
3 tbsp. honey

For the cheesecake mixture

200 grams white chocolate
325 grams of cream cheese (Philadelphia works well)
100 grams caster sugar
500 ml double cream
1 tbsp. honey

Method

  1. Preheat the oven to 190C /gas 5/375F
  2. For this recipe I used a 12 cup loose based mini sandwich tin. If you do not have this you can use a lightly greased 20 cm loose based tin instead.
  3. To make the flapjack mix for the bases, place 250 grams of oats in a bowl.
  4. Add the melted butter, caster sugar and 3 tbsp. of honey to the oats and stir until all the oats are covered.
  5. Add a heaped tbsp. of flapjack mixture to one of the bases and press down with the back of a teaspoon or an end of a rolling-pin. Repeat for the other 11 bases. You should have a thickness of about 1/2 cm in each base or more if preferred.
  6. Place into the preheated oven for 10 minutes. (I had some flapjack mixture leftover so I scattered this in a spare tin and placed it in the oven along with the sandwich tin. This will be used to cover the ice-cream later on so this is important.)
  7. After 10 minutes, take both tins out of the oven and leave to cool.
  8. In the meantime, on the lowest hob setting, melt 200 grams of white chocolate and 100ml of cream in a saucepan. Stir until the mixture is completely blended. Take off the heat and leave to cool.
  9. Place the cream cheese in a bowl.
  10. Add the remaining cream, chocolate mixture, sugar and honey and beat until well blended. At this point the mixture should have thickened.
  11. Add the cheesecake mixture to each of the 12 bases and level off the surface.
  12. Cover the tin with cling-film and place in the fridge for at least 3 hours.
  13. Take the cheesecakes out of the tin and eat!
  14. With any leftover cheesecake mixture,  place in to a container and then in to the freezer over night to make the ice-cream. To serve, spoon some ice-cream in to a bowl and scatter over some of the leftover flapjack mixture. This is not as soft as normal ice-cream so you may have to take it out of the freezer and leave before you can spoon it out.

As this mixture uses double cream and white chocolate, I even made some white chocolate cheesecake truffles from the leftover cream and cream cheese.

White Chocolate Cheesecake Truffles

Ingredients for the Truffles

200 grams white chocolate
100 ml double cream
75 grams cream cheese
1/2 tbsp. honey

Decoration

White Chocolate Cheesecake Truffles

White Chocolate Cheesecake Truffles

Leftover toasted oats from the flapjack recipe above or you can crush some digestive biscuits as well.

The method on how to make truffles can be found in my first blog post here: https://simplysuzyblog.wordpress.com/2014/02/18/baileys-truffles/    Instead of adding the Baileys to the truffle mixture, add the cream cheese and honey. After the mixture is chilled and hardened, you can roll it into balls and cover them with the leftover toasted oats.

Please give this a go and I would love to know how you get on.

Enjoy!